Sunday, November 21, 2010

Natural Disasters

Where I live, we have very few natural disasters.  We get occasional flooding in lower parts of town during heavy rainstorms, but other than that and massive amounts of snow, we are usually lucky in that we do not get struck by natural disasters.  This makes it difficult for students to fully understand what a natural disaster is like because they have never experienced it.  I can help them in this aspect by reading them fictional and non fictional stories about disasters such as Night of the Twisters by Ivy Ruckman (one of my favorites) or stories written by victims of past disasters.  They can also view storm visualizations online to see what type of damage can be done.  They can view before and after photos of an area struck by disaster and discuss what happened to the victims.  
We can practice what to do in the event of a disaster and they can prepare evacuation plans with their family.  They can write paragraphs about what they would take with them if they had to evacuate their house in a hurry.  
As a class or school, the students can either collect items such as non perishable food items or clothing to send to victims of a natural disaster or raise money to help relief efforts.  This could become a good community project as students can hold a regional drive to collect items.  Many relief efforts can accept the help of children such as the American Youth Red Cross.  
Students can search for information about historical natural disasters.  They can graph the locations of these disasters on world maps and make charts indicating the number of deaths and casualties reported to compare the severity of the disasters.  Students can break up into groups.  Each group can research a different natural disaster and then present that information to the rest of the class in a visual presentation.  Students could choose to present a visualization of the storm by recreating it in a controlled environment such as a tornado in a pop bottle or flooding in a large tupperware container.  

Sunday, September 26, 2010

Ask A Scientist

I still have not received an answer from Ask A Scientist yet.  My question was what is the difference between brain cells and other cells that make them last so much longer? 


I was interested in finding out whether brain cell death was a natural occurrence or not.  If it was a natural occurrence then I wonder what the difference is between the 500 brain cells that die this hour and which ones survive to the next hour.  


I would like to use this site in a classroom but I would be worried that the scientists would not answer all of the students' questions and one student might get left out.  

Sunday, September 5, 2010

Web Tools

Animoto (www.animoto.com)
This website allows you to upload photos or video clips and turn them into a music video.  It would be a great attention grabber for the beginning of a lesson or could be used by students as a part of a portfolio displaying photos of the sequence to a project they worked on or a field trip they went on. 
It is very simple and quick to use. A 30 second video is free.  All you need to do is provide the pictures or video. A year subscription is $30.  With a paid subscription you can make longer videos.  
The animated transitions between pictures are nothing too impressive but would appeal to younger children.  You can upload up to 15 elements (pictures/vid clips/text) per video.  You can upload your own music or select one of theirs to add to your video.  The advertisement is that it will make your pictures look the quality of a music video, but that is not quite true.  I could probably do a better job with windows movie maker or an equivalent program but it was much faster to create and they provide you with an automatic embedding code to share with friends, family, or colleagues.  
The site does give a tutorial video of how to use the uploader and make your video but the site was so easy to use, it probably is not necessary.  The only thing I did not like about it was that if you choose to use one of their songs, there is not a search engine to see which ones are available.  You must simply browse through each category to find one you like.  This website could be accessible from anywhere there is an internet connection as long as you have your photos or video clips accessible.  I uploaded my pictures directly from another internet site so they were already handy.  
Here is the video I made using pictures from the science center.  I edited it a couple times, but in all, the final product took less than 5 minutes to create.  


Prezi (www.Prezi.com)
Prezi is a presentation tool that works similar to the way PowerPoint would but in a very nonlinear fashion.  It provides an infinite plane of space to cover your topic using texts, drawings, pictures, graphs, etc.  
The appeal of Prezi is the transitions between slides.  It spins and zooms in and out to create an eye - catching sequence of content.  It is very neat to watch a presentation on Prezi, but it makes me dizzy the way it moves around.  It does look very professional though, as if it was done by skilled computer programmers.  The site offers various video tutorials and a “Help” button. 
I am not sure if many younger students would find this program as easy to use.  Because there is such a large plane of space to use, it is almost overwhelming as to where to place the objects as opposed to the linear fashion of PowerPoint where everything goes on a slide and when you run out of space you simply move to the next slide.  You could make it linear with Prezi if you chose to place everything horizontally or vertically but it would really defeat the purpose of the program.  
Prezi Basic is free to use and can be accessed from anywhere with an internet connection.  The presentation can be downloaded to be viewed offline.  You can purchase Prezi Pro and be able to create presentations offline as well.  Prezi presentations can be easily shared and they provide you with an embedding code. 
I made this very simple one just so I could test out the program.  


Open Zine (www.openzine.com)
The idea behind Open Zine is to allow you to create an online magazine about the content of your choice.  The first thing I noticed about this website that may not make it suitable for classroom use is that on the homepage there are samples of other zines with cover pictures that are not quite suitable for school.  There may be a way to access the website without viewing other zines but it would be something to look into. 
I started to create a simple zine to see how easy the site was to use and it was a bit overwhelming.   This would be great for a year long or semester long project for older students to create.  It is basically a multi - page blog that can be collaborated on by multiple people.  It was easy to upload and crop or resize photos. I did not see any tutorials of how to use the site but there were so many buttons to click on, it was hard to tell where things were.  
It is free and can be accessed from anywhere with an internet connection.  I believe your zine can be shared by link or it could be a private zine available only to those with the password.  

Sunday, June 13, 2010

Topics and Tools

Topic: Relativity 
This website has a list of resources giving an overview on the theory of relativity as well as related topics such as information about Albert Einstein and topics such as the Doppler effect in light.   This would be a good starting place for students just looking for an introduction to the Theory of Relativity.
This site contains information on relativity using easy - to - understand diagrams.  The page is colorful and bright, making it attractive to students.  This is a student - friendly website using understandable vocabulary. 
This company has created various videos illustrating the concepts of relativity, such as simultaneity, making them simpler and easier for students to understand.  
This website has a plethora of resources. It includes links to information about the scientists who paved the way for Einstein, stories of contemporary artists relating Einstein’s work into their everyday life, videos, animations, and quizzes.  This site contains information related to the essence of gravity and collapsed stars.  It also contains brief animations of Einstein’s experiments related to relativity such as a car trying to race a beam of light.  This website is useful in finding information about Einstein relating to his work on relativity. 
Activity
The PBS website has a lot of possible classroom activities with supplemental resources.    One particular activity helps students understand just what the equation E = MC2 means.  The site provides a supplemental graphic organizer to go along with the experiment.  “In this activity, students examine the components of a chemical reaction and make measurements to confirm the conservation of mass in a closed system (quart freezer bag)” (Lightman, 2005).  Students will be mixing harmless citric acid and baking soda in a freezer bag and comparing masses.  It is a structured inquiry lesson as the students are given the question and the procedure.  The teacher will ask the class what they predict  might happen when baking soda and citric acid mix.  The teacher will demonstrate the mixture and show that nothing happens.  The students will work in small groups to mix the substances but adding water to the mix.  Students will be measuring the masses of the substances prior to combining them and then again after.  The students will observe the chemical change as the combination creates a gas and they will discover the conservation of mass after the reaction.  The students can also measure the temperature of the substances before and after and compare them to deicide what type of chemical reaction it was.  
Obstacles
Some challenges that might be faced when integrating this activity into the classroom are time to complete the activity in one class period and also providing the proper saftey gear for each student.  
References
About.com. (2010). Theory of relativity. Retrieved from http://physics.about.com/od/relativisticmechanics/Theory_of_Relativity
Department of Physics, University of Tennessee. (2010). Albert einstein and the theory of relativity . Retrieved from http://csep10.phys.utk.edu/astr161/lect/history/einstein.html
Earbot.com. (2010, June 4). Our World. Retrieved from http://www.youtube.com/user/MyEarbot
Lightman, A. (2005, June). Relativity and the cosmos. Retrieved from http://www.pbs.org/wgbh/nova/einstein/relativity/

Sunday, May 30, 2010

The Heat is On

Setup
The materials I chose for this experiment were brown paper, cheese cloth, a cotton washcloth, and a plastic ziplock bag.  I anticipated the plastic bag and the washcloth being the best insulators.  I hypothesized the plastic bag would trap in the most heat as it is similar to plastic wrap, a material used for locking in heat and preserving food.  Also, I figured the wash cloth would work similarly as cloths are sometimes used in place of pot holders to pick up hot food.  I hypothesized that the mug with the cheesecloth would be the coolest of the four because it was covered with the most porous material.  I also expected that each of the materials would be slightly dampened by rising heat.  
Results
I was correct in hypothesizing the plastic bag would retain the most heat as that mug dropped the smallest amount of degrees (see Appendix A).  I was incorrect in guessing though, that the cheesecloth would let out the most heat.  It was the second hottest mug after thirty minutes.  I was also incorrect in guessing the materials would become moist from the rising heat.  The water must not have been hot enough to cause the heat to rise up as steam.  
If I was choosing one of these four materials to insulate something I wanted to keep warm, I would choose the plastic.  If however, I was trying to cool down a substance,  the brown paper would be the most effective or no insulator at all.  “Heat is the measure of of the internal energy that has been absorbed or transferred from one body to another” (Tillery, Enger, & Ross, 2008).  The brown paper was able to better decrease the internal energy of the water in the mug while the plastic served as a better insulator, maintaining the internal energy.  
Questions
Which of the three methods of heat transfer did the materials encourage or discourage? How do you know? Support your response with evidence from the resources.
Conduction
The ceramic mug would have acted as a conductor for the transfer of the heat from the water.  The mug was cooler than the water inside so some of the heat transferred into it, cooling down the temperature of the water and heating up the mug.  “Anytime there is a temperature difference, there is a natural transfer of heat from the region of higher temperature to the region of lower temperature” (Tillery, Enger, & Ross, 2008).  Since I measured a temperature change, I know that conduction took place.  
Convection
Convection took place in the water.  As the water cooled, it became denser and fell.  The hot water rose to the top.  “In fluids, expansion sents the stage for convection.  Warm, less- dense fluid is pushed upward by the cooler, more -dense fluid around it” (Tillery, Enger, & Ross, 2008).  
What other materials might you choose if you were to repeat the experiment? Which of these do you believe would be the best insulators? Why?
I would like to try foil versus plastic wrap.  I think the foil would be more effective at insulating the mug over the plastic because the plastic is more porous.  I would also like to try a piece of white paper versus a piece of black paper.  I know that white reflects sunlight which is why we wear lighter colors in the summer, but would it also reflect heat?  
Tillery, B. W., Enger, E. D., & Ross, F. C. (2008). Integrated science (4th ed.). New York: McGraw-Hill.

Sunday, May 16, 2010

Engaging in Guided Scientific Inquiry

I chose to investigate the question: How do different surfaces affect the momentum of marbles? For this experiment, I set up a ramp against the edge of my coffee table. The ramp consisted of a turned over cardboard box with another upturned cardboard box positioned underneath it to close the gap between the edge of the first box and the floor. I set a third box at the end of the ramp to act as a barrier for the marble. I used the cardboard as one testing surface. I also used pieces of felt, foam, and sandpaper as surfaces. I laid the pieces over top of the ramp to test them.

One of the challenges I thought I would face was finding a way to keep the marble in a straight path all the way down the ramp. I thought that with the rougher surfaces, especially, the marble would stray to the side, thus traveling a farther distance. However, the mass of the marble propelled it in a straight line in each trial, so this was not a problem. Another challenge was making sure I hit the start and stop on the stop watch at the exact moment the marble hit the ramp and then hit the barrier at the end of the ramp. I had to do a few practice trials to get it right.

I predicted that the cardboard surface would give the marble the most momentum because of its smooth surface. I also predicted the sandpaper would cause the marble to lose the most momentum out of the materials I used due to its rough surface. From the trials I conducted (See Appendix A), I discovered that the felt most inhibited the momentum of the marble. The sandpaper actually had the second fastest trial which was a surprise to me. This could have been because it was not a particularly thick brand of sandpaper. I would probably repeat this experiment using a rougher, thicker type of sandpaper and compare the results. From the results I concluded the fiber of the felt is what slowed the marble the most. From what I know about forces and momentum, I have to conclude that the felt provided the most amount of friction against the marble. I had to wonder if this is why felt is used on pool tables. Perhaps if the tables were made out of different materials, the balls would fly right off the table.

I think the experiment might have worked better if my ramp was not as steep. I might use a more gradual incline so that the marble would not travel as quickly. I might get more accurate measurements with the stop watch this way. Also, it would be interesting to try the same experiment with different types of balls other than marbles. A plastic ball would cause more friction than a marble because of static.

If I was doing this in a classroom, I would provide my students with a list of questions to choose from just as we were. Then, each group would be doing experiments about a similar concept but exploring different aspects of it. I would probably have the students then present their findings to the class after their experiment so that all the groups can share their discoveries. This would be a good way to incorporate technology into the lesson as the students can present their information in the form of graphs or photo presentations.

I would ask the students to make real world connections with the experiments they did. We could then use those connections to further this assignment turning it into an engineering lesson. For example, if the students discovered that the more friction a surface provides, the slower the momentum and they connect that to the fact that they might not go as fast down a grassy hill than down a paved hill, I might ask them to construct a model racetrack using materials that would be conducive to biking quickly, yet safe to ride on.

I would want students to discover the various forces that are acting on the marble that cause it to gain or lose momentum. I want them to realize what aspects of a material will cause it to cause more friction than another material. Also, I would want them to practice the proper way of going through the process of designing and implementing an experiment.

Appendix A


Time (seconds) 
Material
Trial 1
Trial 2
Trial 3
Average
Cardboard
0.65
0.59
0.49
0.577
Felt
0.86
0.79
0.86
0.837
Foam
0.80
0.64
0.65
0.697
Sandpaper
0.75
0.49
0.50
0.580

Sunday, April 11, 2010

Lesson Reflection

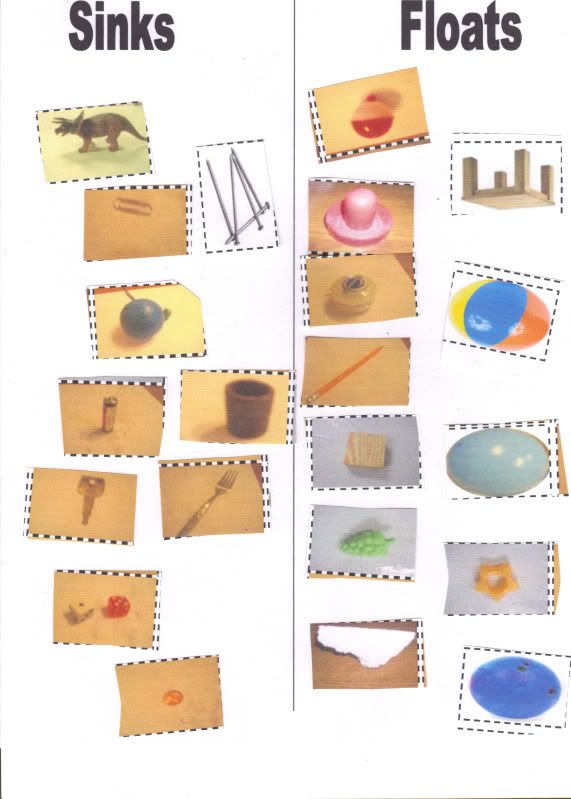
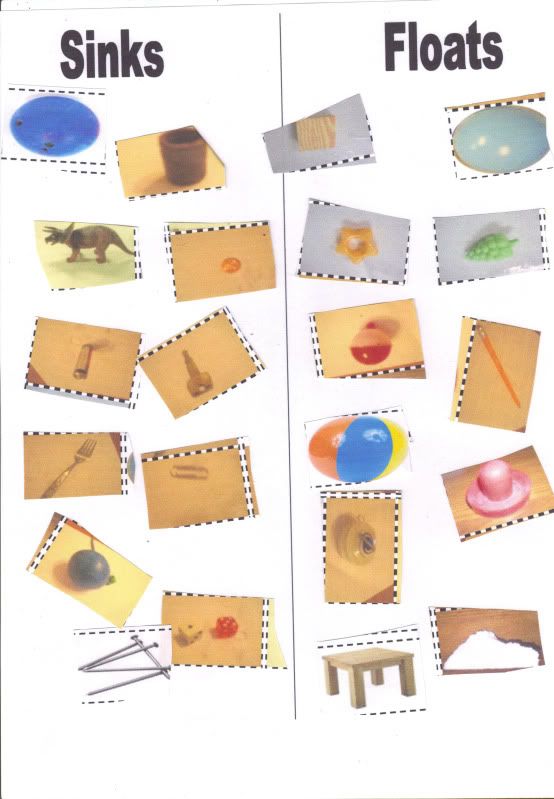
For my lesson, I engaged the students in a "sink or float" experiment. The students made predictions about whether an item would sink or float and then tested out their predictions.

This lesson went really well. The students generated good hypotheses as to why some things float and others sink. At first, they thought that all the small things would sink because they were choosing only small metal items such as the keys and the metal nuts. After they made that statement, I presented them with a very tiny piece of the Styrofoam and asked them what they thought would happen to it. They predicted it, too, would sink, but after they were proved wrong, they began to create a new theory. I asked them how the Styrofoam was different than the other objects and they stated that they were made out of different things. They realized that all the wooden objects would float. They hypothesized that all metal things sink and that anything that has a lot of air inside, such as balloons and hollow plastic items, would float. Using their own hypothesis they were able to correctly predict which items would sink and which ones would float.

The students were very engaged in the lesson. They were very excited to be able to put things into the water to see what would happen to them. It was easy to see the joy on their faces when they proved themselves right after predicting whether an object would sink or float. I gave them lots of positive praise along the way so even if they predicted incorrectly, no one became discouraged. I made sure each child had a chance to choose an object to place into the water. They each had a chance to make a prediction about an object before it went in. I believe this lesson worked so well because it was done with a small group. If I was doing this lesson with an entire class, I would want to have the class split up into small groups with each group having its own container of water and similar objects. This way all the students get the opportunity to explore the objects and get a turn to put them into the water. This keeps everyone engaged.

One of the things I realized about designing the lesson was coming up with questions to ask. While it was simple to come up with a basic outline of how the lesson would go, many of the questions I asked the students were based on how they were responding to what I was presenting them with. Their comments and observations spurred more questions that I would not have necessarily anticipated asking them prior to implementing the lesson.

Things I would change about the lesson would be using a bigger container of water. It began to get crowded with the objects after awhile, but since I did not wish to take objects out, it became difficult to see the effects of some of the items. Also, I think instead of putting the chart on a transparency, I would just make a big board chart with the pictures on it. Since there were so many items, the chart had to be split up onto multiple transparencies and it was time consuming to switch from one to another if we referred back to an object we already did. Another thing I would probably change would be to give the students the pictures already cut out or give them the ones we tested already cut out and just allow them to cut out the ones we did not test. I would make this change because I noticed that many of the students were still at the stage where they had a lot of difficulty manipulating scissors. They took more time cutting than they did trying to decipher which side of the paper the picture should go on. While practicing motor skills is important, I did not want it to be the focus of the lesson.

Below are samples of the students' work. I decided to post these two because of the discrepancy of where the bowling ball picture was pasted. One student said it would sink because it was heavy but another said it would float because it had a lot of air in it. In retrospection, I should have chosen pictures of objects that I could bring into the room so that after the students predicted what would happen to them we could have tested those objects out, too.